Prerequisites
- At least two KLayout windows running, each with the klink plugin loaded on its own port — starting at
8765, then8766,8767, and so on. Each window shows its own port badgeK876xat the right of the toolbar. - The agent side (Claude Code / Codex, etc.) connects through the MCP bridge; calls pick a window with the
sessionargument, defaulting to the first if omitted. - No process PDK is needed here — the demo uses illustrative geometry on a few ordinary layers (
10/0metal,20/0pad,1/0frame,6/0text).
1The klink toolbar
Every KLayout window with the klink plugin loaded gets a small extra cluster of controls at the right of the standard toolbar. That cluster is the entry point for human + agent collaboration:
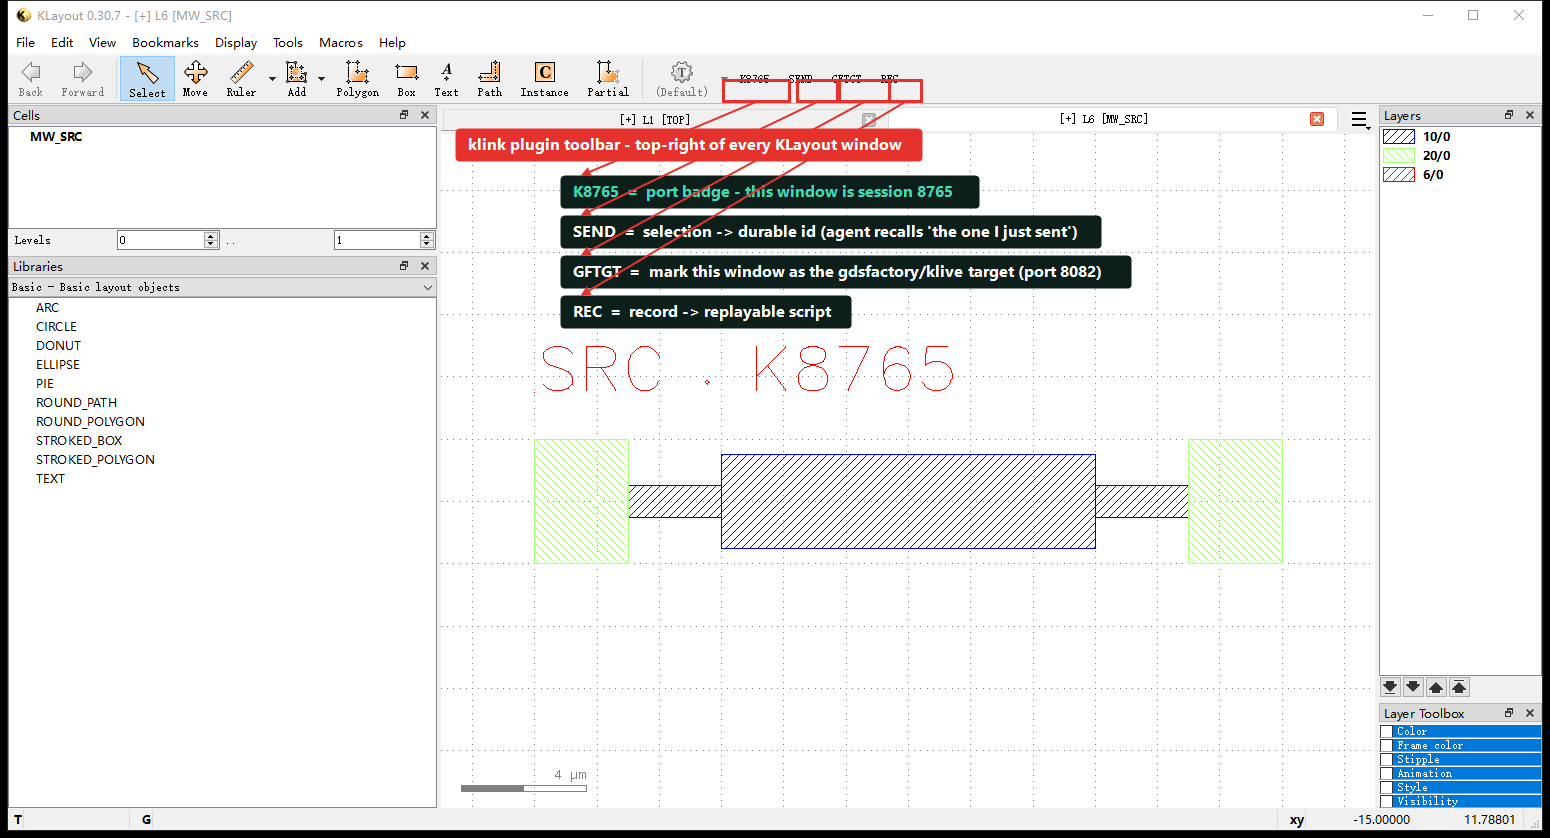
K8765 is the port badge telling you this window is session 8765; SEND hands the current selection to the agent as a durable id; GFTGT marks this window as the gdsfactory/klive target (port 8082); REC records a replayable script. The title bar [MW_SRC] is the currently shown cell name.The next three stages exercise SEND, GFTGT, and cross-window transfer in turn — each is both a button a human clicks and a typed call an agent makes.
2One agent, many windows
klink's session model is simple: each KLayout window = one port = one session. A single agent can hold several windows at once over the MCP bridge and tells them apart by port. Here are two windows as one agent sees them — K8765 on the left holds a source device, K8767 on the right is an empty landing frame:
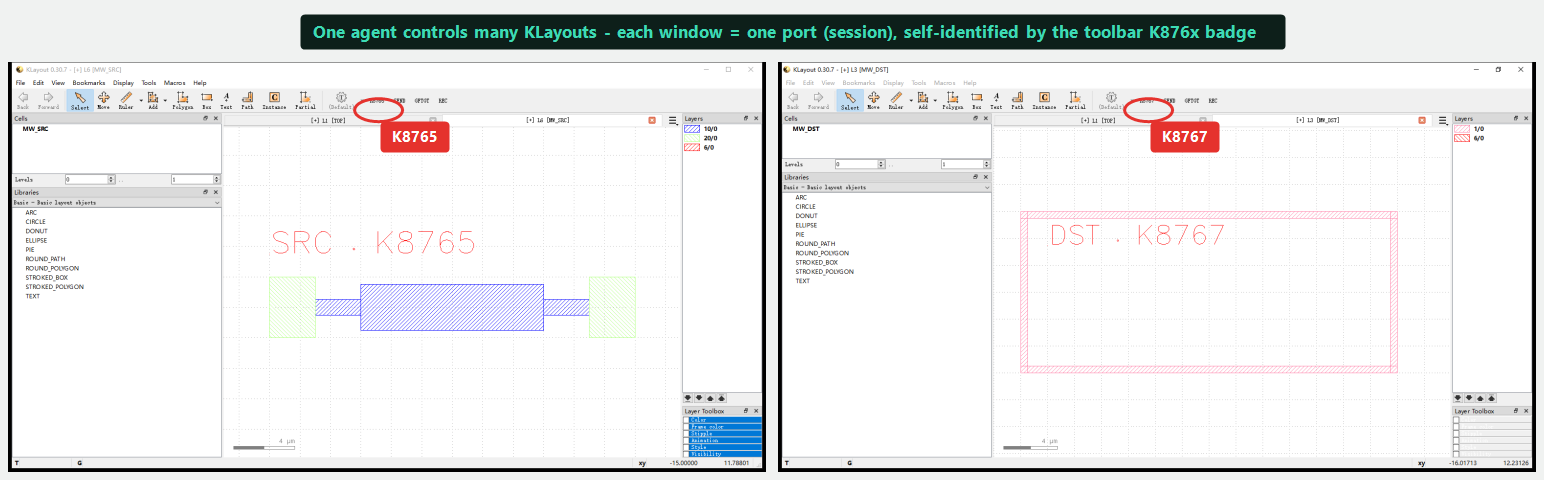
K8765 (source, with a device), right K8767 (target, empty frame). Windows identify themselves by the toolbar K876x badge — an agent passes session="8765" or "8767" to act on each independently, without interference.Because windows are addressed by port rather than by "current focus", an agent can read in one window and write in another without shuffling anything to the foreground — which is exactly what the next three stages rely on.
3SEND: turn a selection into durable agent memory
You select something in KLayout, click the toolbar's SEND, and that selection is recorded into the agent's session memory with a stable id. Later, when you say "the one I just sent" or "this area", the agent resolves it to the exact geometry — no need to re-describe coordinates. The equivalent typed call on the agent side is selection.send_context:
# The human way: select → click SEND on the toolbar
# The agent-equivalent way (what this demo actually called):
client.selection_set_box("MW_SRC", [-12000, -2000, 12000, 2000])   # select the whole device (units: dbu)
snd = client.call("selection.send_context", {"source": "tutorial_demo"})
# -> {"status": "sent", "count": 5, "send_seq": 5}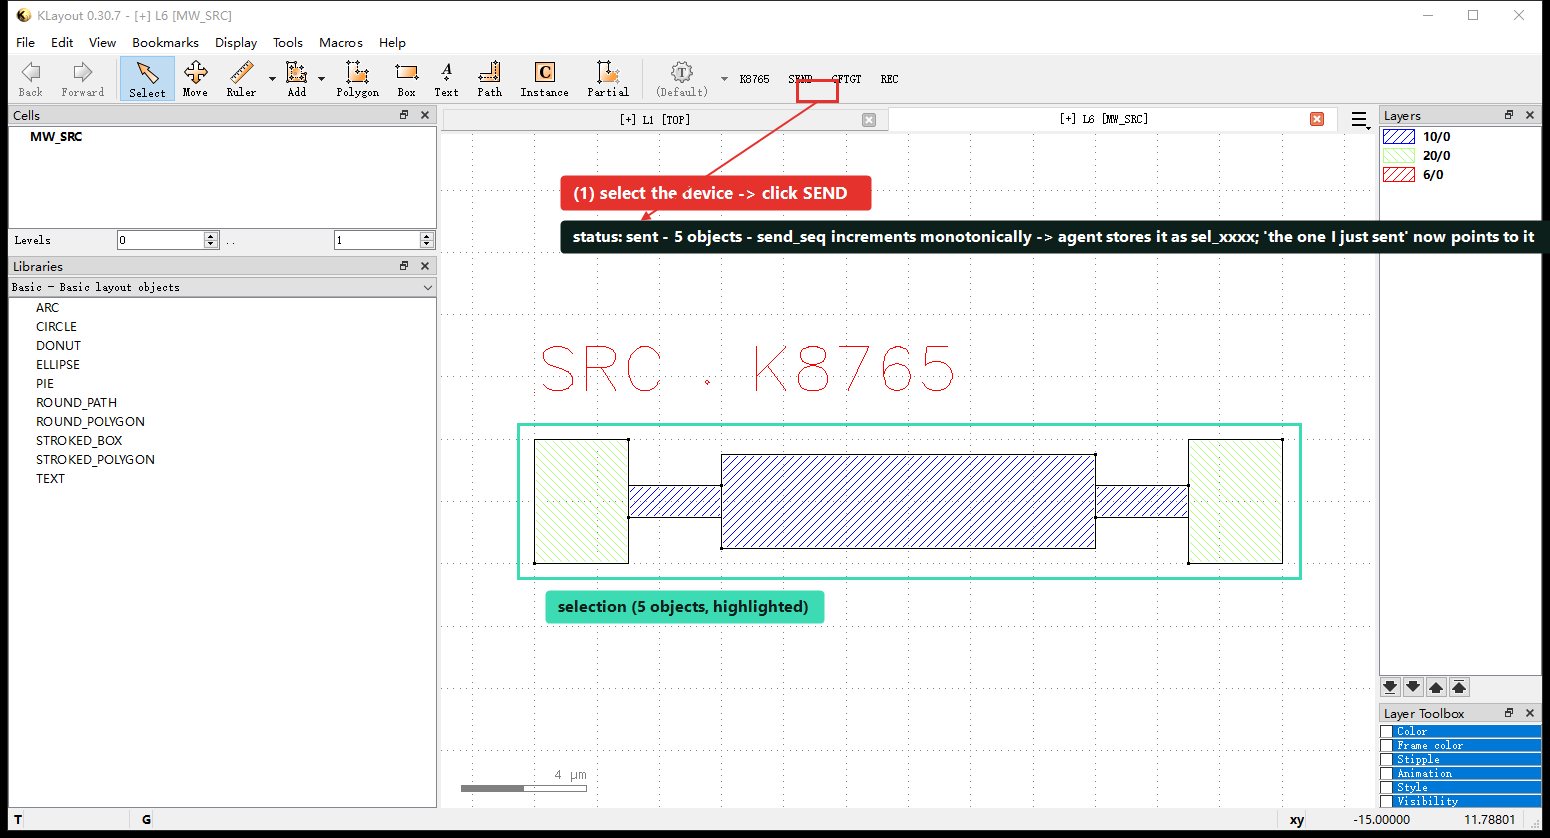
K8765 (teal box, 5 objects highlighted) → SEND. It returns status: sent · count 5 · send_seq 5 — this selection is now a durable entry in the agent's memory (something like sel_xxxx), and "the one I just sent" refers to it in later turns. send_seq is monotonic, and SEND journals to disk before broadcasting, so nothing is lost even if no listener is subscribed at that instant.4GFTGT: aim gdsfactory / klive traffic at a window
With several windows open there's a practical question: when you generate a layout with gdsfactory in Python, which KLayout window should it land in? klive's compatibility port is a fixed 8082, and the GFTGT button aims that traffic at the current window — click it, and this window becomes the gdsfactory/klive target; geometry pushed over 8082 afterwards lands here. The agent-side equivalent is session.mark_klive_target:
# The human way: click GFTGT on the window that should receive the gf layout
# The agent-equivalent way (what this demo actually called), run on K8767:
client.call("session.mark_klive_target", {})
# -> {"ok": True, "klive_target_session": "klayout-8767", ...}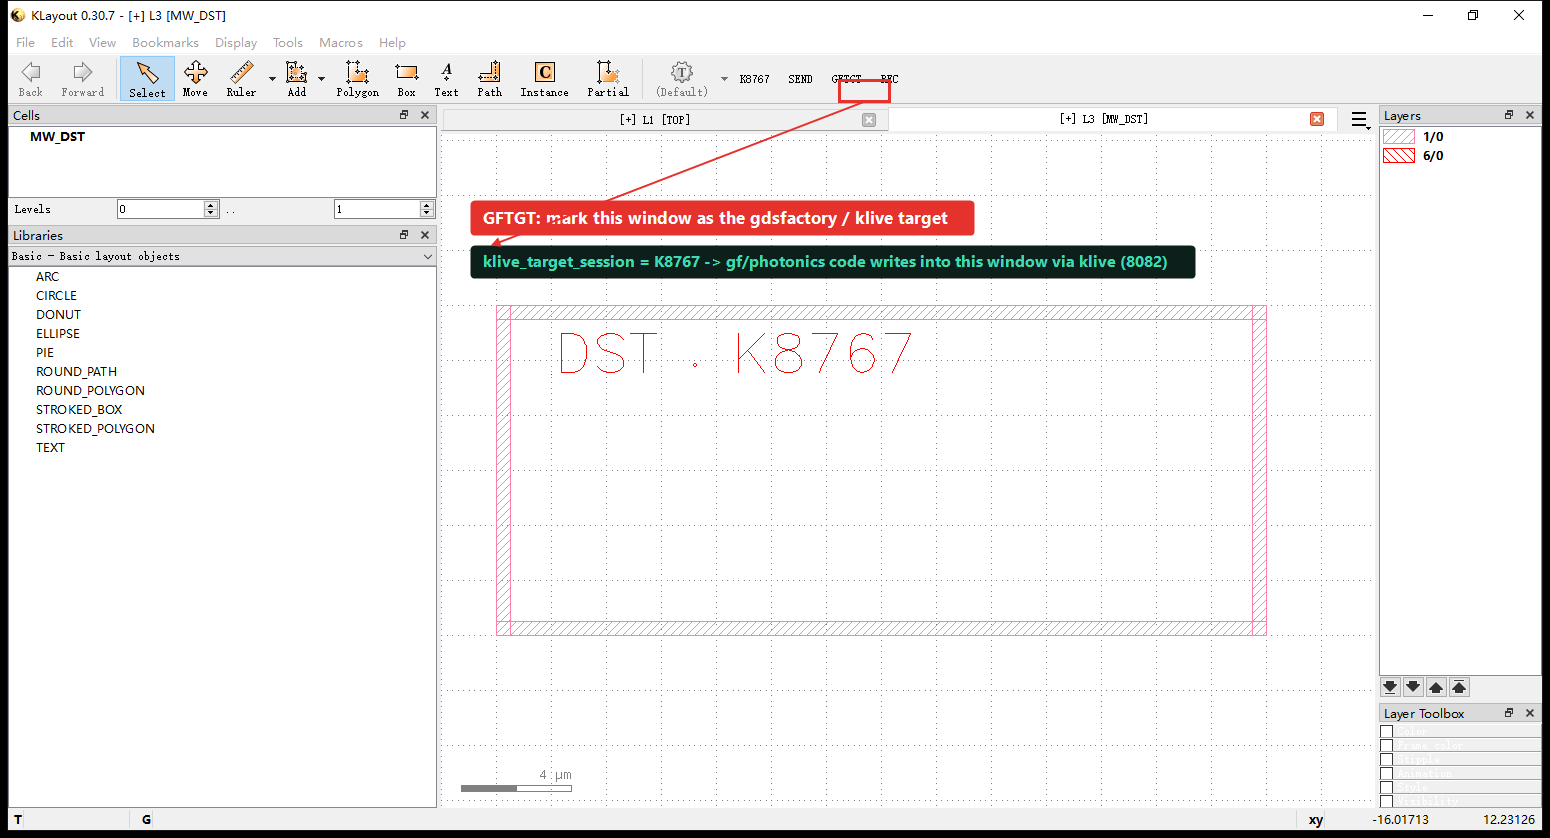
GFTGT on K8767: klive_target_session becomes klayout-8767. From now on, any gdsfactory layout pushed over the klive compatibility port 8082 lands in this window instead of the default first one. To receive on a different window, click GFTGT on that one.5Cross-window transfer: a two-phase move
The last stage actually moves geometry from one window to another. klink's cross-session transfer is two-phase — first dry-run on the target window (compute only, no write, hand you a review), then commit to write for real once it checks out. That makes a move always validate-before-mutate, leaving no half-finished state on failure. It uses the MCP tools klink.transfer_prepare (read the source selection → package → dry-run on the target) and klink.transfer_commit (write for real):
# The 5 objects were already SENT / selected in source window K8765 (see Stage 3)
# Phase 1: prepare -- read the source selection, package, dry-run on K8767's MW_DST
prep = transfer_prepare(source_session="8765", target_session="8767",
                        target_cell="MW_DST", copy_mode="flat_selection")
# target_dry_run.inserted == 0   (a rehearsal, nothing written)

# Phase 2: commit -- write for real after review
commit = transfer_commit(package_id=prep["package_id"])
# write.inserted == 5   (10/0 x 3 + 20/0 x 2)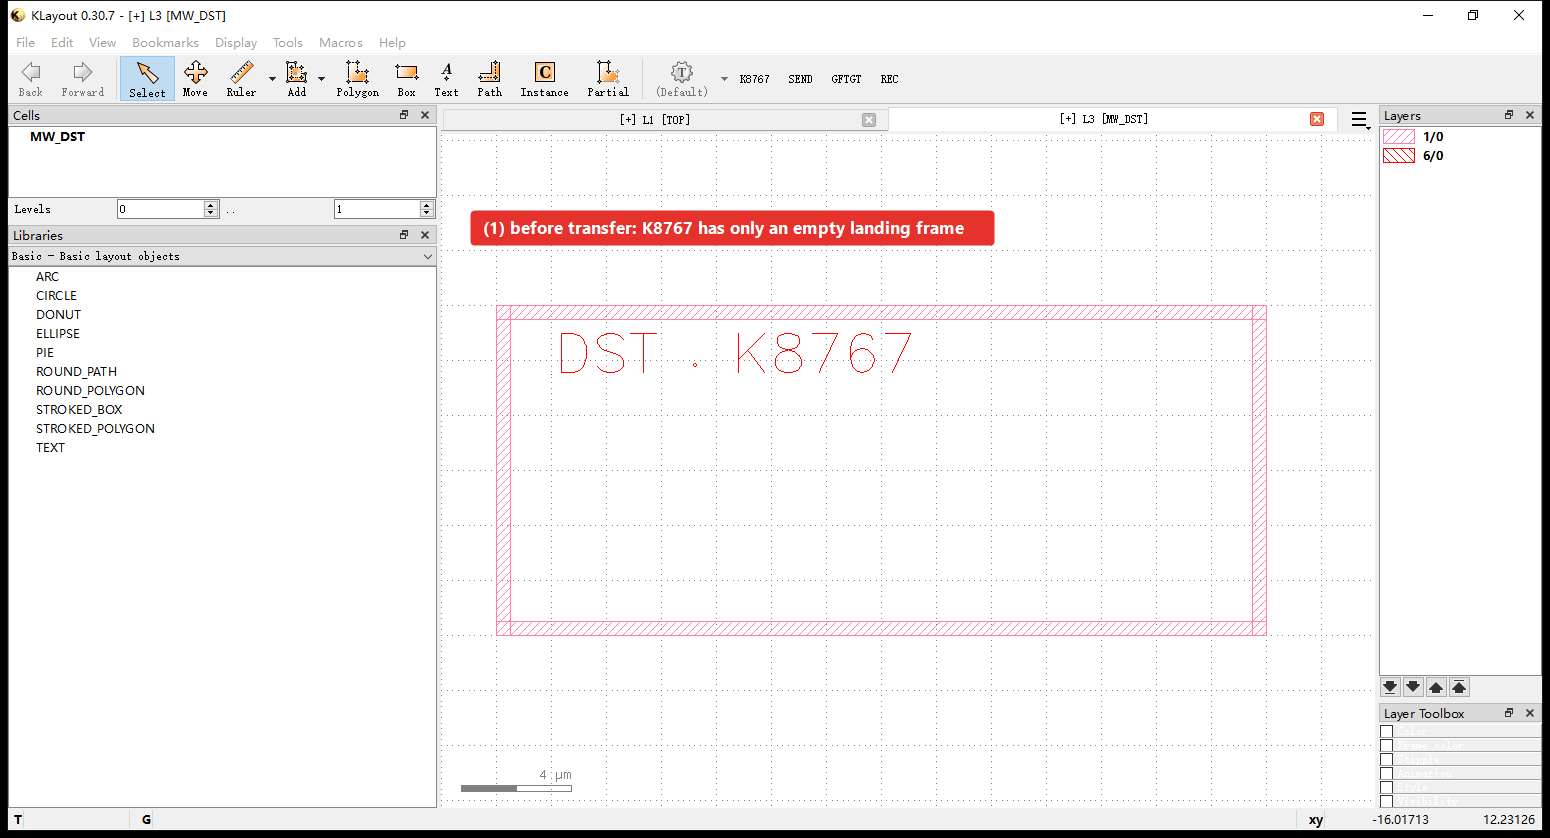
K8767's MW_DST holds only an empty landing frame.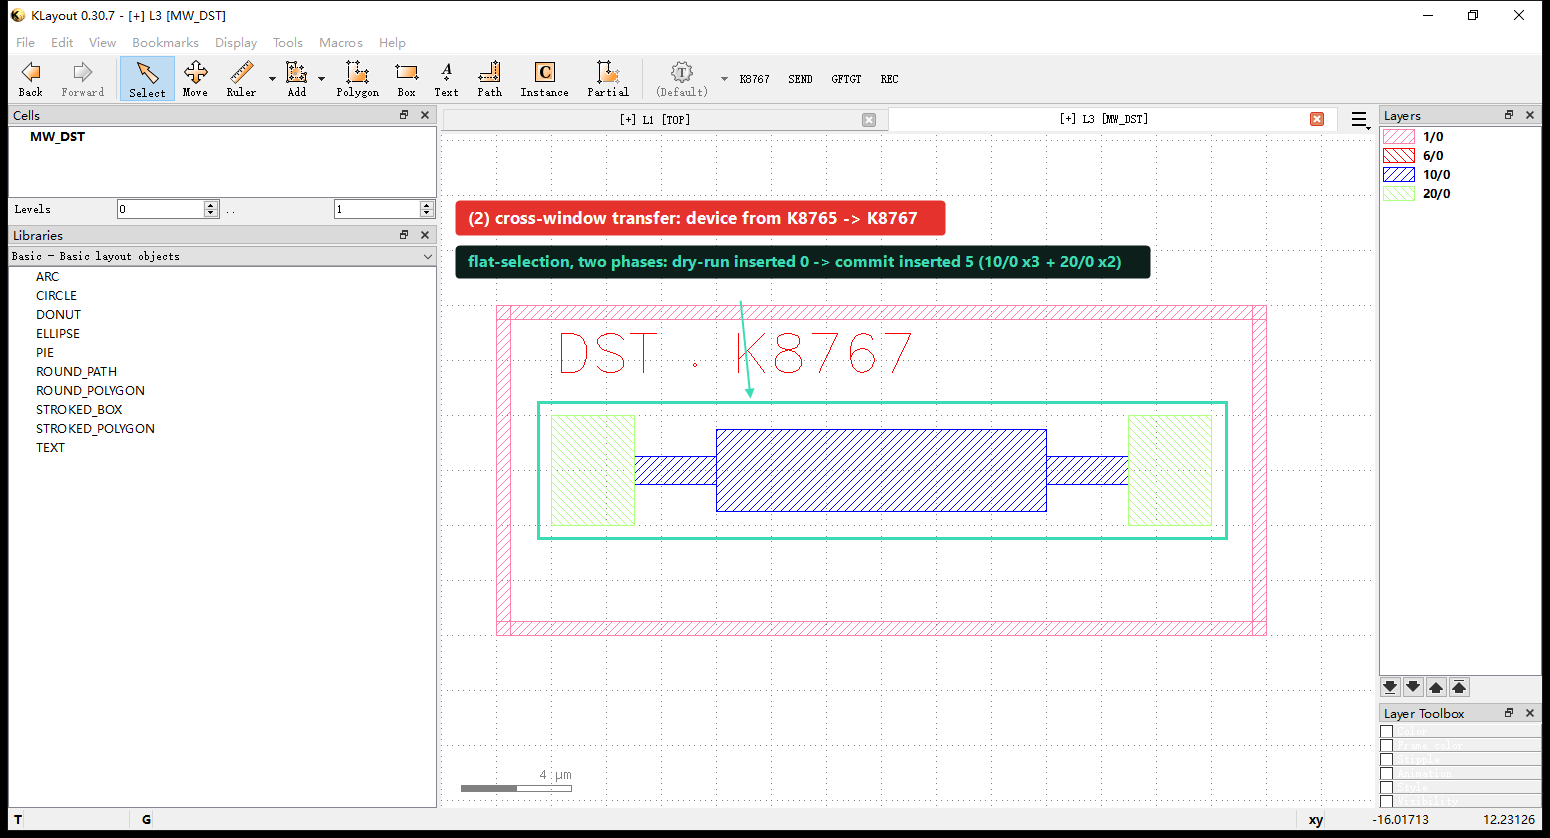
K8765 into K8767. The flat-selection two-phase: dry-run inserted 0 → commit inserted 5 (10/0 x 3 + 20/0 x 2), matching layer by layer the 5 objects selected in Stage 3. The source window K8765 is untouched — transfer is a copy, not a cut.Verify, not screenshot
As Core Concepts says, screenshots are for humans; the real proof of done is the structured return. Here is what each of the three stages actually returned:
{
  "send":     {"status": "sent", "count": 5, "send_seq": 5},
  "gftgt":    {"ok": true, "klive_target_session": "klayout-8767"},
  "transfer": {
    "prepare_dry_run": {"cell": "MW_DST", "requested": 5, "inserted": 0, "by_layer": {"10/0": 3, "20/0": 2}},
    "commit":          {"cell": "MW_DST", "requested": 5, "inserted": 5, "by_layer": {"10/0": 3, "20/0": 2}}
  }
}
Both requested and commit.inserted are 5 and by_layer matches layer for layer — the 5 objects from the source window landed in the target, no more and no fewer, and the dry-run inserted=0 proves validate-before-mutate really wrote nothing before you confirmed. Those numbers are how you judge success; the images just make it obvious at a glance.
Next
Put this control plane to work in your own multi-window flow: one window as "reference/source", another as "workspace"; use SEND to feed the agent a selection from the source, use transfer to move it across in two phases; when generating a layout with gdsfactory, click GFTGT on the target window first to aim it. The deeper field-level docs for these capabilities are in Workflows. To watch the agent actually turn a sentence into a layout / DRC / LVS, see the chat walkthroughs at the top of the tutorials page.